
The brakes on the F355 aren't as good as they could be. Whilst many people upgrade the disks to bigger grooved or drilled items, this isn't necessary unless you're a real track demon. A simple change of the pads is all you need to make a significant difference to braking performance (assuming you have the standard pads installed).
Exchanging the brake pads is a simple job you can carry out yourself if you have the right tools. To do this you will need:
- A trolley jack. Your jack will need to have quite a low profile to fit under the car. If it doesn't slide straight underneath, see the section at the end for a method of getting it under.
- A torque wrench and 22mm socket for the wheel bolts. The wrench is not an absolute necessity but it is the best method of ensuring the wheel bolts are tight enough.
- A pair of mole grips
- A pair of pliers
- Some copper grease (you can buy this at pretty much any car parts store eg Halfords)
When changing brake pads, always do a whole axle, never only change the pads on one wheel otherwise you'll end up with an unsafe car.
You can do any wheel you like first, but work out some order so you don't accidentally do the same wheel twice. It is normally a good idea to use a wooden block between the jack and the jacking point to prevent marring of the car. Slide the jack under the jacking point on your chosen starting wheel and raise the jack until it lifts the car slightly. It is difficult to undo the wheel bolts with the wheel loose, so now loosen the bolts a little then continue to raise the jack until the wheel is off the floor. Jack the car up high enough so that you can get the wheel you've just taken off under the car.
With the wheel off the floor, remove all of the bolts completely and slide the wheel under the car with the outward face pointing upwards. Be careful how you do this as you don't want to mark the inside of the rim. The reason I always put the alloy under the car is because if for any reason the car were to come off the jack it won't fall right to the ground - it will hit the alloy and hopefully stop. If you're under the car at the time you'll be glad of this. If you have some axle stands, then use them in preference.
With the wheel off, look at the caliper. On the outside edge there is a spring holding the pads in place. It's a cross shaped piece of metal that is hinged at the bottom. To release the spring take the mole grips and squeeze the spring vertically in the middle where all the wires cross over. This will allow it to pop out from the top. If you are doing a front wheel, remove the wear sensor from the inside pad using a pair of pliers. Take note of how the wire is routed and be careful not to break it when you remove it.
With the spring removed, the old pads can be slid out of the caliper. You should see that there are a couple of holes in the backing plate for each pad. I used an allen key hooked through these holes to help me pull the pads out.
As the old pads are probably thinner than the new ones, the pistons inside the caliper will be protruding out too far to allow the new pads to slide in place. You therefore need to carefully push all four pistons (two on each side) back inside the caliper. I did this by carefully levering the pistons back in with a pair of screwdrivers. Be careful not to mark the face of the pistons. You have to lever them both at the same time because pushing one in has the effect of pushing the other one out.
With the pistons pushed back far enough, cover the back of the pad with copper grease. Put a decent layer on but don't go overboard, and be sure not to get any on the face of the pad or on the disc. If you do get any, wipe it off completely and degrease it before going any further. Slide the pads back into the caliper and if you have a wear sensor to reinsert, do it now. The cable for the wear sensor fits through the spring - be careful to put it back through otherwise the spring will nip the wire when you reinstall it.
Getting the spring back in is a tricky business but actually very simple if you follow my method. Take the mole grips and put them on the spring in the middle, squeezing it vertically as you did to get it off. Using a pair of pliers, slowly tighten the screw on the end of the mole grips until the top of the spring is low enough to go under the catch on the caliper. Now, with one hand push and hold the top of the spring behind the catch, and with the other hand use the pliers to undo the screw on the end of the mole grips. You have to use pliers as it will be too tight to move by hand. Once the spring has risen far enough to locate on the catch, remove the mole grips and you're done.
Put the wheel back on. You will find a "wheel hanger" useful for this, as F355's do not have studs on the hub. They use wheel bolts which means you need three hands to get the wheel back on easily. The wheel hanger is a steel rod with a thread on the end. Put one of the bolt holes at the twelve o'clock position, screw in the hanger, and then slide the alloy onto the hanger. You now have two hands free to put the other four bolts in - snug them up but don't go really tight. Finally, remove the wheel hanger and snug up the last bolt. If you don't have a wheel hanger you can still manage; it just makes life easier. You can get one from www.hillengineering.co.uk
With the wheel back on, drop the car back down to the ground and then tighten all five bolts properly using the torque wrench to ensure a correct torque. The wheel bolts should be tightened to 98 Nm (that's 72 foot lbs).
Repeat this procedure for the three other wheels, then bed in the pads according to the instructions in the box. After you've bedded the pads in it is advisable to re-check the wheel bolts to make sure nothing has come loose.
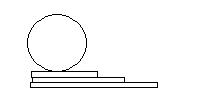
Raising the car to get a jack underneath
If your jack won't fit under the car, you can raise it using just a few pieces of MDF or plywood (or whatever you have available), half to three quarters of an inch thick. Each piece needs to be big enough to drive the wheel onto and support it completely. Arrange the three pieces on top of each other in a staggered fashion so that they form a sort of ramp. Then just drive the car onto it (see illustration). You should find that three pieces gives enough clearance to get most jacks under, but use more if necessary.
There are some very low height jacks available especially for racing cars. If you intend to do a lot of maintenance at home it is worth investing in one of these to save on the time required to get the car raised like this.